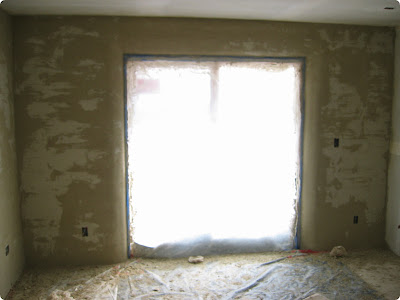
On Friday Joshua, Trevor and I completed interior
gypsum wall plastering. It is great to have all of the APEX blocks finally covered. Here is a pic of the sliding glass patio door on the bedroom south wall.
Marty applied and
knocked down ceiling texture while Trevor, Raphael and I shuffled scaffolding around. Between the rain this week and the water evaporating from the plaster, the house is humid like Florida. Below is a pick of Marty up top with Trevor and Raphael below. Thanks for reading. I appreciate your comments.
 Green comment for today:
When selecting finishes, especially those inside the home, consider the simplest materials with the least amount of additives. This will result in the best
indoor air quality. For example, my interior wall finish is 99%
gypsum plaster (plaster of Paris).
I chose to avoid premix or ready mix materials because they contain
vinyl compounds which act as binders. Once applied, the
Volatile Organic Compound (VOC) portion of the binder will evaporate into your home atmosphere potentially affecting respiration in folks with chemical sensitivities. It is true that the VOC concentration will reduce dramatically over time, but it is best to not allow the material in the home if it is not needed.
To determine what is in a product, look at the
Material Safety Data Sheet (MSDS). This can be confusing when a manufacturer decides to include a series of products on one MSDS. You sometimes see the words "may contain one or more of the following" in the Composition/Ingredients section of the MSDS. In this case, you need to call technical support to see if the particular product you are interested contains any offending ingredients.

 Joshua continued installing tile in the shower. Thanks for reading. I appreciate your comments.
 Marty installed copper downspouts between the gutters and drains. Here is a pic of the downspout on the northwest corner of the home.
 Other tasks from day 110:
 Justin, Marty, Raphael, Georg and I installed corrugated metal soffit material around the perimeter of the home. We are pleased with the results. Here is a pic of the northwest corner soffit.
 Green comments for today:
 Trevor and I did a bit of site cleanup while Joshua applied waterproofing to the shower floor. We pulled the masking tape and plastic protecting the soffit area to reveal our plaster work up top. We are pleased with the results. Below is a pic of the northwest corner and porch area (please ignore the temporary downspouts). Thanks for reading. I appreciate your comments.

 I’ll close with a pic of me in front of the west wall near the end of day 105. Thanks for reading. Please feel free to leave a comment.
 Marty applied and knocked down ceiling texture while Trevor, Raphael and I shuffled scaffolding around. Between the rain this week and the water evaporating from the plaster, the house is humid like Florida. Below is a pick of Marty up top with Trevor and Raphael below. Thanks for reading. I appreciate your comments.
 Green comment for today:
 Thanks for reading. Please feel free to leave a comment.

 The guys from Independent Energy Systems were back again today to install another rack for the photovoltaic array. Thanks for reading. I appreciate your comments.
 Here is a pic of Cindy in the dining room on Saturday after the wall has partially dried.
 Here is a closeup pic of the kitchen window bullnose. This detail gives the house a nice old-world feel. Thanks for reading. I enjoy reading your comments.

 Joshua poured mortar on the shower floor and created a surface that tapers down slightly from the outside edges to the drain.
 We completed applying masking tape and plastic sheet around the perimeter of the building in preparation for interior plastering. Thanks for reading. Please feel free to leave a comment.


 Some other tasks from day 96:
 We also installed the utility room door today.
 I’ll close with a couple pics of Trevor’s daughter Zephyra showing her plastering technique. She visited today with mom and grandma. Thanks for reading. I enjoy reading your comments.


